how to renew let’s encrypt ssl certificate in centos using SSH command

Nowadays hacking is so simple,with out much technical extreme anybody can access other data,so it is important to encrypt the data when it exchange between the system,fortunately we have a standard security protocol called ssl to encrypt our data,among the ssl certificate let’s encrypt certificate is most popular and it is free.We can install Let’s encrypt ssl certificate in centos with easy ssh commands,but it will expire with 3 months to renew that we have to use let’s encrypt ssl certificate centos renew commands in ssh prompt,here we are finding out solution for the question “renew let’s encrypt ssl certificate centos”.

To obtain a new or tweaked let’s encrypt ssl certificate version of this certificate , simply run certbot.
To non-interactively renew *all* of your certificates, run
“certbot renew”


#certbot renew
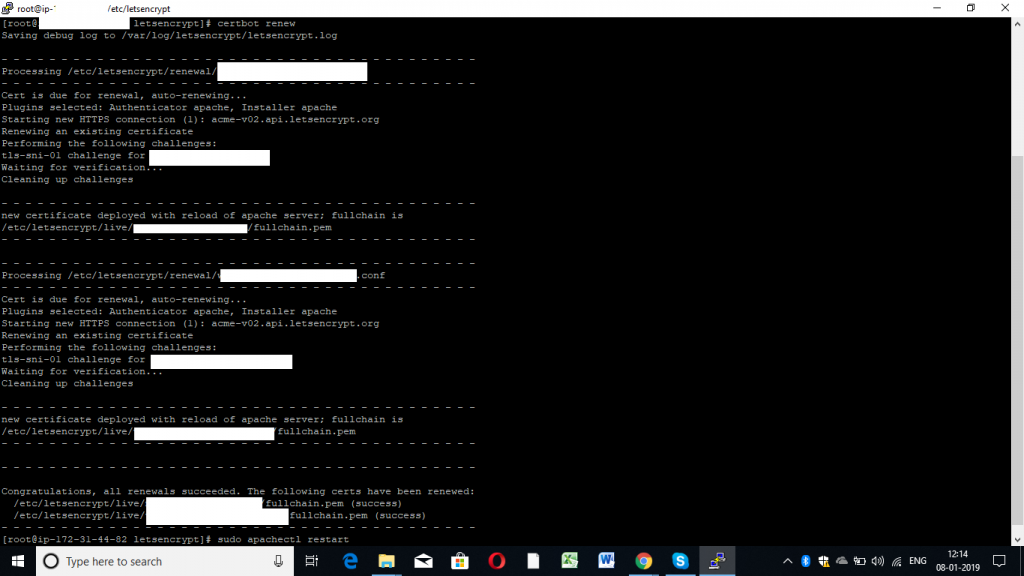
renew let's encrypt ssl certificate centos

Install Certbot if any issue with above command please follow below steps

how to install let’s encrypt ssl certificate in centos using SSH command

How to declare a session Variable in Django Python

session is one of the key variable for programmers,it allowing to connect the website pages easily,in simple if we store session variable in one page you can access from other pages the same values.Sessions are the technique used by Django for keeping track of the “state” between the site and a browser.Here we are checking declare a session Variable in Django Python
When we are creating a project in Django,Sessions were enabled automatically inside setting.py see below

INSTALLED_APPS = [
    ...
    ...
    'django.contrib.sessions',
    ....

MIDDLEWARE = [
    ...
    ...
    'django.contrib.sessions.middleware.SessionMiddleware',
    ....

Lets see how we can assign a session variable

# Set a session value my_visite to 1
request.session['myweb_visits'] = '1'

To change session value

# if not Set it automatically declare as 0
myweb_visits= request.session.get('myweb_visits', 0)

request.session['myweb_visits'] = myweb_visits + 1

To get session value

#To Get session variable myweb_visits value
myweb_visits= request.session['myweb_visits']

To delete session myweb_visits value

# To delete session myweb_visits
del request.session['myweb_visits']

Example Code

Open urls.py files add test URL

from django.urls import path
from . import views

urlpatterns = [
    path('', views.index, name='index'),
    path('test/', views.myweb_visits, name='myweb_visits'),
]

Add myweb_visits function in view.py bottom

def myweb_visits(request):
    num_visits = request.session.get('num_visits', 0)
    request.session['num_visits'] = 1 + num_visits
	
    x = num_visits + 1

    return HttpResponse("your visitng the websites : "+ str(x))

See declare-session-variable-django-python result in below Output Images

declare-session-variable-django-python

How to Set a cookie attribute Samesite value in PHP ?

What is samesite cookie in php

We all know most of the website using cookie for sharing information between browsers and the server,so cookie is storing in the local browsers,so their is a probability of misused by other domain which we are using in out html code.for example when am adding Instagram images in my blog tutorialshore.com,i have to use Instagram domain name in my html code to point Instagram images, the cookies in the browser that belong to these other sites will also be sent.Therefore those third parties Instagram can track your activity by using Cookie. Fortunately we have cookie attribute called samesite,by setting a cookie to samesite strict we can prevent third party misuse of cookies.samesite cookie attribute having two values Strict and Lax.AS the name says Strict completely prevent the cookie will not be sent along with requests initiated by third party websites.But in the case of Lax only get method cookie will be sent along with requests initiated by third party websites

Method

 we have a method to accomplish this,which can be done by one of the most common function header() in php


Add cookie Samesite strict by using header() function 

add below header() functions in the top of your home page

header("Set-Cookie: key=value; path=/; domain=www.tutorialshore.com; HttpOnly; Secure; SameSite=Strict");

See how we can check a cookie is samesite, we can do with the help of chrome browser as we know almost every browser have the inspect element option, within inspect element tab we have the application section to check cookie see below image.

Click F12 function button

go for application >> cookies


set a cookie samesite value in PHP

How to install Django python framework in windows 10

We know Django is the most popular python framework ,it only work with python installed system,before starting Django we should install python.So lets see how to install python in windows 10. Fortunately installing python is so easy

Step 1)

Install python in windows 10

First you need to get the python installer,as of now latest python version that support Django is Python 3.6.7. Go to https://www.python.org/downloads/ and Download Python 3.6.7 and install don’t forget to tick add python 3.6 tp PATH,it will assign PATH variable

python-Django-step1

Step 2)

Check python installed successfully

open CMD in windows

c:/users>python
will respond like below
Python 3.6.7 (v3.6.7:6ec5cf24b7, Oct 20 2018, 13:35:33) [MSC v.1900 64 bit (AMD64)] on win32
Type "help", "copyright", "credits" or "license" for more information.

python-Django-step2

Step 3)

install pip if not installed in your system

D:\my_project >

Step 4)

Create a project directory, you can create project directory anywhere in your system,here we are created in D drive with name my_project
then move current directory to project directory in CMD

D:\my_project >


Step 5)

Install virtual environment using pip
D:\my_project>pip install virtualenv

Create a virtual environment with name env_mysite you can rename anything as per your reference

D:\my_project>virtualenv env_mysite

install django in windows 10

Step 6)

Activate virtualenv
D:\my_project>env_mysite\scripts\activate

env_mysitePS D:\my_project>

Step 7)

Install django

env_mysitePS D:\my_project>pip install "django>=2.1,<2.2"

Step 8)

Create A New project

env_mysitePS D:\my_project>django-admin startproject myweb_site

Step 9)

Change Directory

env_mysitePS D:\my_project>Cd myweb_site

Step 10)

Run developemnt server

env_mysitePS D:\my_project> python manage.py runserver 

install-django-in-windows-10-step9

Finshed

Open http://127.0.0.1:8000/ in any browsers

install-django-in-windows-10-step-1

Congratulation you have installed Python django framework
Note:
Update latest changes in djnago

python manage.py makemigrations

python manage.py migrate

How to create a small project using Django